
7/24/2017
Wildlife
photography is one of the fastest growing hobbies today. With DSLR and lenses
getting cheaper by the minute, it is only bound to grow faster. With more and
more people taking to wildlife photography as a means to connect with nature
and share its beauties, it’s become imperative that you start pushing the bar
of your photography ever higher. One of the best and easiest ways to do that is
to try out rim lighting shots. If you do not know what that means, you are on
the right page – keep reading.

There are many ways
to get creative with your wildlife photography, but in this article I will
teach you one of the most impactful. Let’s start with getting to know rim
lighting a little better.
3
What is rim lighting?
By
definition, rim lighting in photography means
any image where the light at the edges of the subject seems more intense than
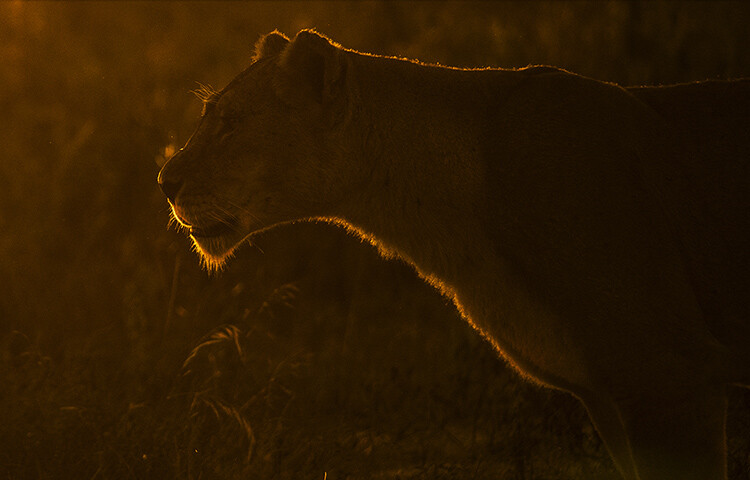
the other areas. For example, take a look at the image below.

Notice how the
outline of the giraffes stands out? The rim of the subject looks well-lit.
Quite simply, that’s what rim lighting is about.
How do you achieve rim lighting?
First and foremost,
you need to position yourself such that the subject stands between your camera
and the light source (more often than not, that will be the sun in nature
photography). Rim lighting will happen in the natural world only if you can see
the rim, lit up with your eyes. Some of the easiest subjects for this are
animals that have a lot of fur and are not too smooth coated, for example,
bears, giraffes, lions, or deer with antlers.
Take a look at the
visual below for a quick understanding on positioning yourself.

Guidelines
There are a few
guidelines that you need to adhere to while trying to obtain a rim-lit image:
·
Rim lighting happens best when the sun is low in the sky, so try to look
for a subject around that time.
·
A dark background is necessary (check all the images in this article) so
make sure that you try this in an area where your background is conducive to
good results.
Speaking about the
camera now, composition aside, rim-lit photography can be done using one of two
approaches.
Approach #1 – Exposure Compensation
Using exposure compensation is
the easiest way to execute rim-lit shots. Once you have ensured that you are
able to see a rim-lit subject just go ahead and try a test shot with a little
underexposure. Take a look at the sequence of images below.

Make note, by
default when using the built-in metering system in your camera,
more often than not the image in such scenarios (a lot of black and little bit
of white) will turn out to be a bit washed out. It is just that the camera does
not know what is the most important part of the image and makes an error in
judgement (it tries to average the exposure).
Knowing where to
stop with regards to exposure compensation is a subjective call. You could be
happy with the second or the third image above. Just know that the more you
underexpose the darker the surroundings will get.
This is a perfectly
valid way of getting a rim-lit shot, but I generally recommend the second
approach. The simple reason being that exposure compensation doesn’t reset
itself. If you forget your camera is set at an EV of -2, it would mean disaster
for the next few shots where you may not be trying to create a rim lighting
shot.

Approach #2 – Exposure Lock (AE-L)
This approach is
slightly more advanced in terms of understanding. Imagine yourself standing in
front of a monkey with the sun setting behind him and the immediate background
being dark trees. Now, do the following:
·
Point your camera toward the sky. Half press your shutter-release button
to activate metering.
·
Next, press the Exposure Lock Button (AE-L
or * button) which often resides right where your right-hand thumb would rest.
·
Now, recompose your image with the subject as needed and click.
What happens is
that when you point your camera towards the sky and ask it to meter from there,
it takes a light reading from the bright sky and sets up a shutter/aperture
combination accordingly. Let’s assume for a minute that the value came out to
be 1/2000th at f/4.
Now, if you press
the Exposure Lock button, the camera will lock on to these readings and will
not change them for your next set of clicks. So when you recompose and
photograph the monkey, the camera uses the locked in settings thus rendering
only the areas in the frame that are as bright as the sky correctly. In this
recomposed image, the only area that is as bright as the sky is the outline of
the monkey, giving you a nice, well exposed rim-lit image.

Practice around home first
Go ahead, practice
the AE-L at home and then get out there and try a couple of rim-lit shots. Here
is what you can do at home, before heading out to the wild.
Catch hold of a
friend or family member and make them stand in front of a car at night. They
should be covering the headlight of the car completely. If you stand at the
other end with your friend in between yourself and the light source, you should
be able to see his entire body with rim lighting.
Now that you know
how to get a subject, go out there with your camera and start trying the
exposure compensation trick to get some fabulous rim-lit images. Please share
your rim-lit wildlife images below as well as any questions you may have about
this technique.
Read more from our Tips &
Tutorials category
Rahul Sachdev grew up on Jim Corbett stories and was
quick to find his calling in the wild. Despite enjoying a successful career in
the software industry, he nurtured a deep-rooted passion for wildlife and
photography, a journey that took him far and wide across the country and
overseas. Today, Rahul leads photography tours and conducts workshops where
he helps people make the quantum shift from taking images to making them.
you've got achieved a omnipresent process upon this article. Its wholly proper and intensely qualitative. you've got even managed to make it readable and clean to access. you have a few valid writing function. thank you consequently much. photography blogspot
ReplyDelete